Fire Simulation Written in Assembly
The Goal
This project started as a requirement for a semester-long project in my Computer Organization class.
I had envisioned how cool it would look to simulate flames rising up and reacting to turbulence in the wind, with smoke creating those cool vortices and trails you see in real fires.
I think it looks great, but have a look and judge the finished product for yourself!
I cheated a bit with this video- I used some javascript which told YouTube to autoplay in 2x speed so it would look more impressive :)
The Inspiration
As with many of my projects lately, everything is inspired by my Wi-Fi controlled LED strip passion project, Lumen. The "Fire 2012" effect from the authors of the WLED project looks amazing, but I didn't like the scaling to 2D because it doesn't look realistic.
I've grown since beginning this project and I understand that a full-blown fluid simulation isn't exactly what WLED needs, since the effects need to stay lightweight, but I still used this as inspiration with the idea of rendering realistic fire on a limited processor like the one found in the ESP8266 or ESP32.

WLED's "Fire 2012" Effect
Core Concepts
This uses an "Eulerian" fluid simulation, which means the fluid is represented in a 2D matrix (as opposed to Lagrangian, which uses a particle-based approach)
I figured this approach would be better for performance, and easier to translate directly to a screen. It uses a staggered grid, which I explain in more detail below.
The core calculations behind each frame in the fluid simulation can be summarized in 4 steps:
- Modify Velocity Vectors
- Reduce Net Divergence
- Advect Velocity Components
- Advect Smoke/Heat Components
The staggered grid contains u- and v-components to represent horizontal and vertical velocities, respectively. Each cell is bordered on all four sides by these components (hence, staggered grid). This makes calculating the divergence later very simple. See the diagram below.
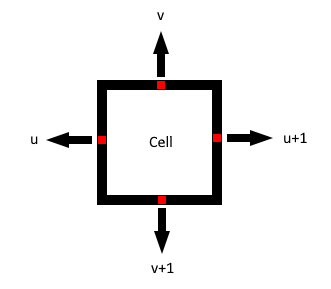
The staggered grid setup. Each cell is surrounded on all sides by a velocity component.
Step 1: Modify Velocity Vectors
This is the first step of the calculation. In this step, we perform actions such as multiplying by a decay factor (0.99, for example) for all components, as well as simulate the "buoyancy" of hotter air by incerasing upwards velocity in proportion to the heat at a cell.
This step is essentially the step which transforms the simple fluid simulation into a full-blown fire simulation. We simulate "combustion" by checking each cell in the grid with the three required elements of the fire triangle: heat, oxygen, and fuel. If these conditions are met, fuel is depleted, while heat and smoke are increased at the given cell.

Fire Triangle image from Wikipedia. Image Credits: User:Gustavb - Own work, CC BY-SA 3.0, Link
Step 2: Reduce Net Divergence
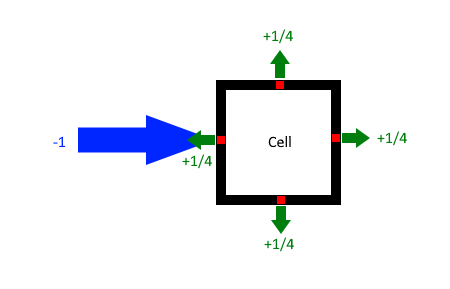
For simplicity, we simulate an incompressible fluid. This means that the net divergence (outflow - inflow) of each cell is ideally zero. In practice, this means finding the net outflow (see arrows below), then subtracting that amount from all sides.
A good example can be seen below. When a large inwards flow comes from one side, an equal but opposite force is applied on all sides in order to eliminate the divergence at that cell. This is repeated for all cells. Note that this affects previous cells we have gone over, so the entire grid is "solved" like this five times in total. (Though this number can be increased for more accuracy, or reduced to prioritize performance. Five is a happy medium.)
Step 3: Advect Velocity Components
Now that the vector field of u and v components is relatively happy, with the net divergence hopefully close to zero, we need to advect the velocity components. Fluids are not static, the currents move along with the flow.
This can be modelled using semi-Lagrangian advection. Essentially, for each u and v component, find out where it would have come from, and sample the corresponding component from that location and store it here.
This was arguably the most challenging part of the process. I encountered numerous bugs, with the entire flow moving unexpectedly to any side, or exploding into chaos. Eventually, I had to sit down and work out the details on paper. The specifics can be seen outlined in my notebook sketch below.
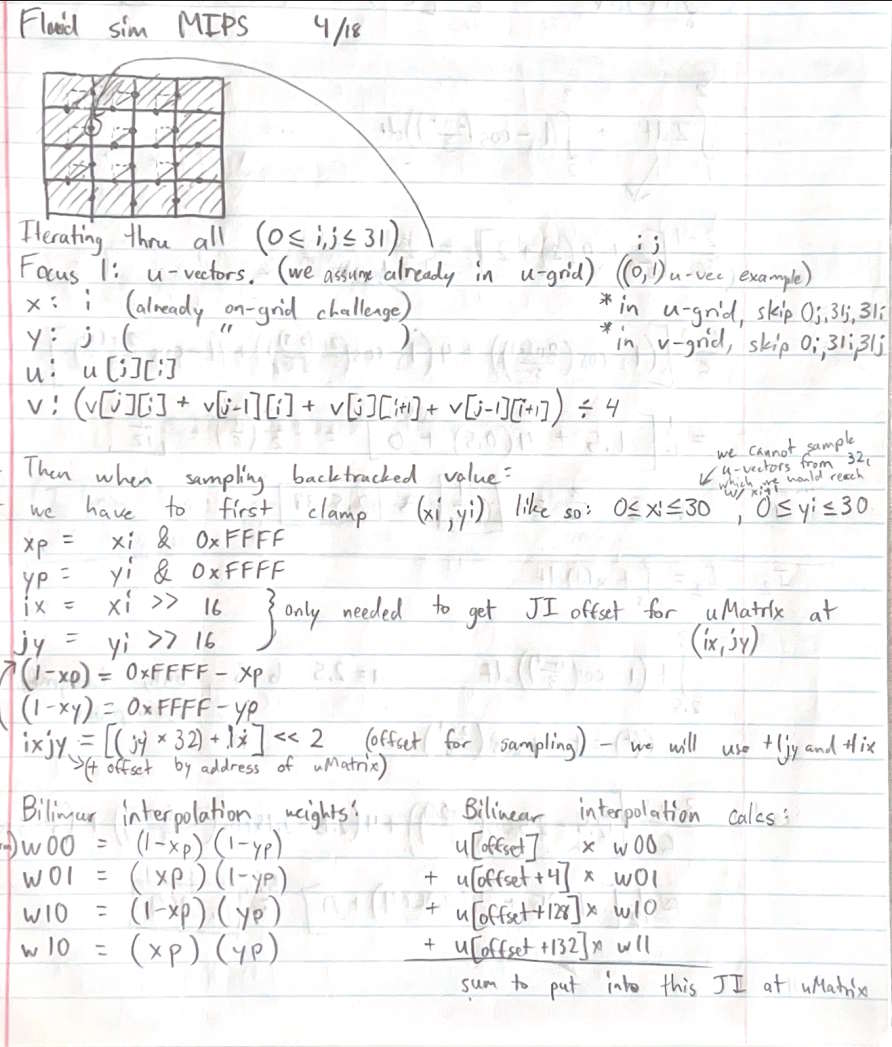
Notebook sketch of u-component advection. Note that v-component advection is very similar, yet different due to alignment with the staggered grid.
Step 4: Advect Smoke/Heat Components
This step is very similar to the vector advection step, but smoke/heat is assumed to be at the center of the cell as opposed to the edges, so minor changes need to be made to the implementation.
These components are also sampled bilinearly from their backtracked positions, which allows for very smooth flow of "dye" from one spot to another. (In fluid simulations, people will often call components which don't interact with the simulation, like smoke for example, dye.)
Below you can see the dye advection in action.
Red Dye Dispersed by a Strong Current. I did not cheat in this video :) this is the real-time performance of the simulation
Final Words
I found this project incredibly engaging. In this post I didn't even touch on the assembly implementation specifically, rather the high-level concepts behind it all. But the process of handling registers, memory offsets and more on the absolute lowest computational level available was a fun challenge which will be sure to change the way I program in the future. By the time I was finished, I was able to implement nearly anything I wanted in assembly relatively quickly, and efficiently with performance in mind.
This is also the final project for a computer organization class I am taking with Ken Arnold at SDSU. This will be his last semester teaching before his retirement, and I hope this project sends him off with the proper farewell he deserves.
Professor Arnold, if you're reading this, I wish you a great retirement. It's been a pleasure taking your class :)